Wednesday, August 29, 2012

Chocolate + Pumpkin = YUM!

So my husband and I have gotten in this really bad (but wonderful) habit of needing something sweet to eat after dinner. Unfortunately, the other night we didn't have anything that would satisfy our sweet tooth, so I decided to make something from semi-scratch. I took a combination of two separate recipes and this is what I came up with...

Pumpkin Cream Filled Chocolate Cupcakes with Chocolate Buttercream Frosting! 

Cupcakes:
Box chocolate cake

Pumpkin Cream Filling:

1 8oz pkg. cream cheese softened
1/3 c. canned pumpkin
1/4 c. sugar
1/4 tsp. ground cinnamon

In a medium bowl mix together cream cheese, pumpkin, sugar, and cinnamon until thickened. Set aside for later.

Chocolate Buttercream Frosting:

1/2 cup unsalted butter, softened
1 tsp. vanilla extract
1/8 tsp. salt
1 (16 oz) pkg. powdered sugar
2/3 c. unsweetened Cocoa powder
5-8 tbsp. milk

Beat first 3 ingredients at medium speed with an electric mixer until creamy.

Gradually add cocoa and powdered sugar combination alternating with 3-4 tbsp milk, 1 tbsp at a time, beating at low speed until blended and smooth after each addition. Continue process until all cocoa and powdered sugar mixture is added. Makes about 2 1/4 cups.

*if you like lots of frosting double this recipe

Putting it all together:

Once your cupcakes have cooled, you need to fill each one with the Pumpkin cream filing. Cut out the center of your cupcake using either a small pairing knife or whatever you have handy. I found a pumpkin carving tool that worked great! Gently scoop out the center and discard.

With a pastry bag and tip squeeze filling into cupcake until it is level with the top of your cupcake.

*There is no need to cover filling with leftover cupcake because you will be covering the top with frosting. I'm sure there are several ways to do this, but this is the way I found that worked best for me.

Add Chocolate buttercream frosting in another pastry bag with a star tip. Using a spiral motion apply frosting to cupcake. Once the cupcakes are all put together. Place in a covered container and store in the refrigerator. Buttercream frosting MELTS!

Enjoy!

*recipes adopted from Better Homes & Garden and Southern Living magazines 


Tuesday, August 28, 2012

Pinterest Interest: Initial Wreath

On my Pinterest account I have an entire board dedicated to wreaths. I love them! I am just now getting into making them and have found that this new hobby is really fun. Every time I pull in my driveway and walk up my steps to our front door, I get a little bubble of joy. I say to Ryan "Look at our wreath! Isn't it pretty?!"

This design idea was inspired from the blog Broken Treasures . She has got some great ideas and tutorials. This is my take on her beautiful Initial Wreath. 


I started with a pressed board letter that I found at Hobby Lobby, some yarn that I had left over from a scarf I had perviously made and a glue gun. (A crafters best friend!)


I took my yarn and started wrapping my "S" and used my glue gun to help keep it in place as I moved along. The ends were a little tricky, but I just glued and made a long zig zag pattern up and down the end and it worked great.


Once I got it all wrapped and looking wonderful. I added some decorative pieces that I found at Michael's. Some red and yellow/green foam berries, a felt flower, and an amber gem that I glued to the center of my flower. I then glued down all these pieces to my "S".


Then to finish it off, I added some sheer ribbon that matched my yarn to hang my initial wreath on the door.

Happy Wreathing!

Coming Soon! While I was at Michael's I also got some other stuff to make a grape vine wreath that I'm really excited about!

Saturday, August 25, 2012

Happy Flying

So, my daughter and I are getting ready to leave for a mini vacation tomorrow morning. We're heading down to Franklin TN, my home town, to make Ellie's debut and visit family and friends. This is Ellie's first time flying and I'm a little apprehensive about it. She is a beautiful baby, smart and full of personality, but she is also a fire cracker! Now, my son Riley is laid back and easy going... these two couldn't possibly be more different.

The first time Riley flew he was only three months old. All my friends had told me their horror stories of their first flights and I was really worried! I really didn't want to be "that" Mom on the plane that everyone avoided and glared at because my baby was screaming uncontrollably. But Riley was an angel! I carried him in a front carrier and he fell asleep while we made our way to the terminal. Then he proceeded to sleep through boarding, take off, and LANDING! It wasn't until I stood up to get off the plane that he woke up, and even then he was as cool as a cucumber.  Even now he is still good at flying, and I don't stress about it at all.

Now, I know a lot of our flying luck comes from Riley's personality. But I would also like to think that some of it has had to do with me. My Momma is an extremely knowledgeable woman, and she gives really great advice. I am proud to say that she is a huge reason as to why I am a confident Mother and have such a heart to work with children. Ever since I found out I was expecting our son, my Momma has given me this piece of advise... "Calm Moms have calm babies" and man, this has proved to be true. It simply means if you are worked up and nervous about a situation, your child will feel this vibe from you. Children are extremely intuitive and it doesn't take much for them to get out of whack because of the energy they are perceiving around them. Especially if you've already decided that your child is going to misbehave and that the situations is going to be an epic failure. So here are few tips I've gathered over the past 15 years of kiddo experience....

  • Stay calm and think positive
  • Have "high" age appropriate expectations: if your child is 2 don't expect them to act like a 5 year old, but also don't let them do as they please and blame it on the age old excuse "terrible twos!" 
  • Be prepared: if you're going to be at a place that requires your child to sit and be still for an extended period of time, bring back-up! Snacks, quiet toys, and things that will keep their attention. 
So tomorrow as we get up in the wee hours of the morning and make our way to the airport, I must remind myself to stay calm and that she's going to do great! And if things don't go as smoothly as I'd like, I'll have packed plenty of food and toys to entertain her till we land safely in Nashville. 

HAPPY FLYING! 

Saturday, August 11, 2012

Dinosaur "Place": Dinosaur Sensory Table

My son Riley has this wonderful fascination with dinosaurs, like most boys do at one time or another. He stomps and roars around the house all the while claiming to be a "big dinosaur" but "NOT a mean one!" So in celebration of this interest I decided we should make a dinosaur sensory table aka (according to Riley) "Dinosaur Place". Not only was it fun playing in "Dinosaur Place", but we had a blast putting it all together.

First we started with an empty 32 quart container. Then we walked around our yard and gathered stuff to put in our Dino land; sticks, rocks and "trees". I brought out a small plastic bowl to be our pond and we collected Riley's dinosaurs. Finally we got our shovels and since we have a garden plot that we aren't using this year, we borrowed some dirt.


We put in the dirt in the container, picked the perfect place for the pond and filled it up with some water. Then we added our sticks, rocks and "trees" and put our dinos in place. LET THE FUN BEGIN!


Riley had a blast! He stomped and roared. The dinos ate, took a nap, and had a bath.  Then naturally the pond became more of a mud pit after all the dinos were squeaky clean so the fun shifted from dinos to MUD! 


For the next couple of days we will have our very own Jurassic Park and then we'll start over and make something new to learn and explore with. 


Wednesday, August 1, 2012

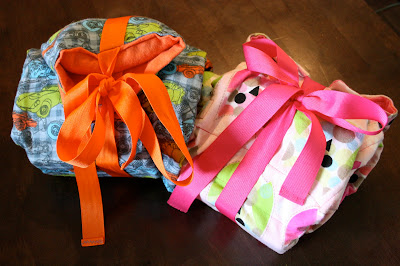
Pinterest Interest: Car Seat Coolers

As I'm sure many of you have already figured out, Pinterest is a great resource for what ever you fancy. If you haven't discovered Pinterest yet, you definitely should!

Anyway, I have found hundreds of ideas for crafting, decorating, and recipes. I have tried to make myself use these ideas instead of just collecting them and letting them sit in cyber space. One pin I recently came across, was how to make car seat coolers for your little ones. Riley hates getting into a hot car seat! So this was something that I really needed to make for him and Ellie as the summer heat drags on.


I got the directions from a blog eighteen25. She has a great tutorial and it's super easy to follow. I only made a few changes to my car seat coolers. 
  • I only added 4 ice packs pockets 
  • I trimmed my ribbons shorter and added a small hem to the ends of my tie
  • I used a combination of beans, corn, and lentils for my weights (because I didn't have rice) 

The first time I used the coolers, I took my kids to the aquarium. We were there about 2 hours and when we came out their seats were nice and cool and the ice packs were still frozen. My mom also had the great idea to get a thermal tote to keep the coolers in while you're traveling from place to place. 

I keep all the ice packs in their pockets, roll up the cooler, and store it in the freezer. So all I have to do when we're ready to leave is grab it and go! 


(If you like my thermal tote it's a Picnic Tote by ThirtyOne and I know a great consultant!)   

Tuesday, July 31, 2012

Pickles!

This weekend I embarked on a new journey... canning! I have been gardening the last couple of years, but haven't been able to give my garden the time and attention it requires because every time I've planted a garden I've gotten pregnant. Must be something in the air. This year however, I am not pregnant and so although I'm now a busy Momma of two, I still have found a little time here and there to grow a few plants (and lots of weeds!) including cucumbers.

My cucumber plants have done really well this year and so I decided to try my hand at making pickles. I bought a "Ball" starter kit that included 3 pint jars, a canning basket for lowing the jars into a hot water bath, and INSTRUCTION! This has proved to be a great buy! I also bought a dill pickle spice packet. So all I had to do was combine water, vinegar, and the spice packet and bring it to a boil. It doesn't get much easier than that.


Now, I am not intending this to be a tutorial on making pickles because this was truly a test run. Maybe as I become more confident in my ability I will create one, but for now this is just a story of my canning adventure.

I decided on slices and spears for my pickles. So I cut them all up and added them to my jars. Then, once the pickling liquid was ready I added it to my cucumbers.  I then "finger" tightened my lids, loaded up my basket and lowered into the hot water bath.


5 minutes later I pulled them out and set them aside to cool. Amazingly all of my jars sealed correctly and in just a short 24 hours we will have homemade pickles ready to enjoy! 


Sunday, July 22, 2012

DIY Pacifier Clips

I'm one of those people that enjoy accessorizing when ever possible and what better way to spruce up at little one's attire than a fun and colorful paci clip?! Now I'm not sure if any of ya'll have had this problem but we have lots of different kinds of pacis and not all of them have the ring that most paci clips attach to. So after some research and I've figured out how to make a paci clip that is universal to all pacifiers.


This is what you'll need:

• Ribbon of your choice (I've found that the 7/8 ribbon works best)
• thread
• suspender clips
• cording

Measure your ribbon to about 10 inches.  If you're going to layer your ribbon like I am in the pictures then now is when you'll want to sew them together. Then measure out a piece of cord about 5inches long.

Fold one end of your ribbon 1/4 inch and then fold again 1 inch. Now mark at the top of your fold. This is where you are going to add a button hole. If your sewing machine is compatible or if you have the know how add your button hole to where you placed your mark.


If you chose not to use a button hole you can fold the ribbon and cut a small half circle where you've placed your mark.


Once you've created the button hole insert your cording into the hole, making a loop about 3 inches long outside of the button hole. Fold your ribbon over again and stitch around the rectangle. (I've used a zig zag stitch) Then add a criss cross stitch through the center of your rectangle. This is what holds the cording in place.

On the other end of your ribbon place the ribbon through the suspender clip ring and then fold 1/4 inch and then another 1/2 inch fold. Stitch across to secure suspender clip.


TA DA! You have an universal pacifier clip ready for any paci you throw at it!